[VB] Adodc 클래스 사용하기

■ Adodc 클래스를 사용하는 방법을 보여준다. 1. 프로젝트 / 구성 요소 메뉴를 클릭한다. 2. "컨트롤" 탭에서 "Microsoft ADO Data Control 6.0(OLEDB)" 항목을

■ Adodc 클래스를 사용하는 방법을 보여준다. 1. 프로젝트 / 구성 요소 메뉴를 클릭한다. 2. "컨트롤" 탭에서 "Microsoft ADO Data Control 6.0(OLEDB)" 항목을

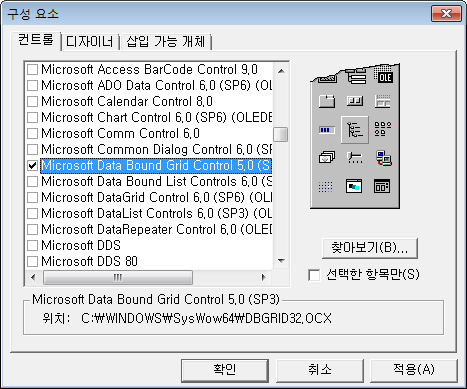
■ DataGrid 클래스를 사용하는 방법을 보여준다. 1. 프로젝트 / 구성 요소 메뉴를 클릭한다. 2. "컨트롤" 탭에서 "Microsoft Data Bound Grid Control 5.0"
■ Clipboard 클래스의 Clear 메소드를 사용해 클립보드를 지우는 방법을 보여준다. ▶ 예제 코드 (VB)
|
1 2 3 |
Clipboard.Clear |
■ Clipboard 클래스의 GetText 메소드를 사용해 클립보드 문자열을 구하는 방법을 보여준다. ▶ 예제 코드 (VB)
|
1 2 3 4 5 |
Dim strText as String strText = Clipboard.GetText() |
■ Clipboard 클래스의 SetText 메소드를 사용해 클립보드에 문자열을 저장하는 방법을 보여준다. ▶ 예제 코드 (VB)
|
1 2 3 |
Clipboard.SetText "테스트" |
■ ToolBar 클래스에 버튼을 추가하는 방법을 보여준다. ▶ 예제 코드 (VB)
|
1 2 3 4 5 6 7 |
pToolbar.ImageList = pImageList pToolbar.Buttons.Add 1, "Button1", "버튼#1", tbrDefault, 1 pToolbar.Buttons.Add 2, "Button2", "버튼#2", tbrDefault, 2 pToolbar.Buttons.Add 3, "Button3", "버튼#3", tbrDefault, 3 |
※ pImageList가 이미지를 갖고 있는 것으로 가정한다.
■ ImageList 클래스에서 이미지를 추가하는 방법을 보여준다. ▶ 예제 코드 (VB)
|
1 2 3 4 5 6 7 8 9 10 11 12 13 |
Dim pEarthPicture As Picture Dim pPlanePicture As Picture Dim pRocketPicture As Picture Set pEarthPicture = LoadPicture("c:\earth.ico") Set pPlanePicture = LoadPicture("c:\plane.ico") Set pRocketPicture = LoadPicture("c:\rocket.ico") pImageList.ListImages.Add 1, "Image1", pEarthPicture pImageList.ListImages.Add 2, "Image2", pPlanePicture pImageList.ListImages.Add 3, "Image3", pRocketPicture |
■ StatusBar 클래스에서 패널을 추가하는 방법을 보여준다. ▶ 예제 코드 (VB)
|
1 2 3 4 5 6 7 8 9 10 11 12 13 14 15 16 17 18 |
Dim pPositionXPanel As Panel Dim pPositionYPanel As Panel pStatusBar.Panels.Clear pStatusBar.Panels.Add 1, "PositionX" Set pPositionXPanel = pStatusBar.Panels(1) pPositionXPanel.Text = "X 좌표 : 100" pStatusBar.Panels.Add 2, "PositionY" Set pPositionYPanel = pStatusBar.Panels(2) pPositionYPanel.Text = "Y 좌표 : 100" |

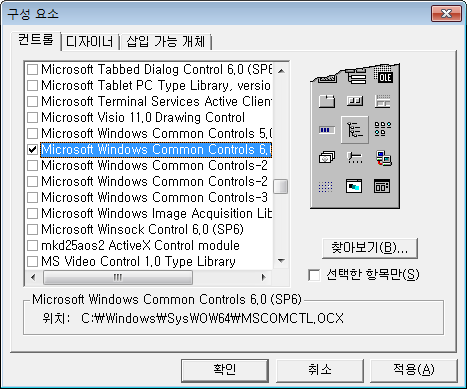
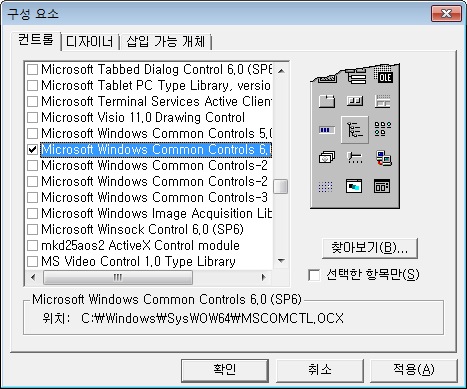
■ ToolBar 클래스를 사용하는 방법을 보여준다. 1. 프로젝트 / 구성 요소 메뉴를 클릭한다. 2. "컨트롤" 탭에서 "Microsoft Windows Common Controls 6.0" 항목을

■ StausBar 클래스를 사용하는 방법을 보여준다. 1. 프로젝트 / 구성 요소 메뉴를 클릭한다. 2. "컨트롤" 탭에서 "Microsoft Windows Common Controls 6.0" 항목을
■ Form 클래스의 PopupMenu 메소드를 사용하는 방법을 보여준다. 1. 도구 / 메뉴 편집기 메뉴를 클릭한다. 2. 아래와 같이 메뉴를 작성한다. ▶ 표
■ 아래 한글의 테이블 행을 추가하는 방법을 보여준다. ▶ 예제 코드 (VB)
|
1 2 3 4 5 6 7 8 9 10 11 12 13 14 15 16 17 18 19 20 21 22 23 |
'-------------------------------------------------- ' 아래 한글 테이블 행 추가하기 '-------------------------------------------------- ' pHwpCtrl : HwpCtrl OCX ' strTableID : 테이블 ID '-------------------------------------------------- Public Sub HWPAppendTableRow(pHwpCtrl As HwpCtrl, strTableID As String) Dim result As Boolean pHwpCtrl.MoveToField strTableID, False, False, False pHwpCtrl.Run "TableCellBlock" pHwpCtrl.Run "TableColPageDown" pHwpCtrl.Run "Cancel" pHwpCtrl.Run "TableAppendRow" End Sub |
■ 아래 한글의 단위를 구하는 방법을 보여준다. ▶ 예제 코드 (VB)
|
1 2 3 4 5 6 7 8 9 10 11 12 13 |
'-------------------------------------------------- ' 아래 한글 단위 구하기 '-------------------------------------------------- ' dMilimeter : 밀리미터 ' 반환값 : 아래 한글 단위 '-------------------------------------------------- Public Function HWPGetUnit(dMilimeter As Double) As Long HWPGetUnit = Round(dMilimeter * 283.465) End Function |
■ 아래 한글 문서 여는 경우 보안 경고창을 숨기는 방법을 보여준다. 1. 첨부 파일에서 hwpctrl.reg 파일을 더블 클릭해 레지스트리 키를 추가한다. 2.
■ 아래 한글의 문서 마지막 위치로 이동하는 방법을 보여준다. ▶ 예제 코드 (VB)
|
1 2 3 4 5 6 7 8 9 10 11 12 |
'-------------------------------------------------- ' 아래 한글 문서 마지막 위치로 이동하기 '-------------------------------------------------- ' pHwpCtrl : HwpCtrl OCX '-------------------------------------------------- Public Sub HWPMoveLast(pHwpCtrl As HwpCtrl) pHwpCtrl.MovePos 3 End Sub |
■ 아래 한글의 문서 첫번째 위치로 이동하는 방법을 보여준다. ▶ 예제 코드 (VB)
|
1 2 3 4 5 6 7 8 9 10 11 12 |
'-------------------------------------------------- ' 아래 한글 문서 첫번째 위치로 이동하기 '-------------------------------------------------- ' pHwpCtrl : HwpCtrl OCX '-------------------------------------------------- Public Sub HWPMoveFirstPosition(pHwpCtrl As HwpCtrl) pHwpCtrl.MovePos 2 End Sub |
■ 아래 한글의 테이블을 삽입하는 방법을 보여준다. ▶ 아래 한글 테이블 삽입하기 예제 (VB)
|
1 2 3 4 5 6 7 8 9 10 11 12 13 14 15 16 17 18 19 20 21 22 23 24 25 26 27 28 29 30 31 32 33 |
Dim pRowHeightArray As Variant Dim pColumnWidthArray As Variant pRowHeightArray = Array(1) pColumnWidthArray = Array(30, 50) HWPInsertTable pHwpCtrl, "Table1", pRowHeightArray, pColumnWidthArray HWPSetRowCellValueArray pHwpCtrl, Array("항목", "설명") HWPSetRowCellAlignmentArray pHwpCtrl, Array("center", "center") HWPAppendTableRowWithCellValue pHwpCtrl, "Table1", Array("개발 도구", "Visual Studio 2013") HWPSetRowCellAlignmentArray pHwpCtrl, Array("left", "left") HWPAppendTableRowWithCellValue pHwpCtrl, "Table1", Array("데이터베이스", "MS SQL Server") HWPSetRowCellAlignmentArray pHwpCtrl, Array("left", "left") HWPAppendTableRowWithCellValue pHwpCtrl, "Table1", Array("3자 컴포넌트", "DevExpress, TeeChart") HWPSetRowCellAlignmentArray pHwpCtrl, Array("left", "left") HWPAppendTableRowWithCellValue pHwpCtrl, "Table1", Array("개발 언어", "C#.NET") HWPSetRowCellAlignmentArray pHwpCtrl, Array("left", "left") HWPMoveLast pHwpCtrl ' "아래 한글 문서 마지막 위치로 이동하기" 참조 |
▶ 아래 한글 테이블 삽입하기 (VB)
|
1 2 3 4 5 6 7 8 9 10 11 12 13 14 15 16 17 18 19 20 21 22 23 24 25 26 27 28 29 30 31 32 33 34 35 36 37 38 39 40 41 42 43 44 45 46 47 48 49 50 51 52 53 54 55 56 57 58 59 60 61 62 63 64 65 66 67 68 69 70 71 72 73 74 75 76 77 78 79 80 81 82 83 84 85 86 87 88 89 90 91 92 93 94 95 96 97 98 99 100 101 102 103 104 105 106 107 108 109 110 111 112 113 114 115 116 117 118 119 120 121 122 123 124 125 126 127 128 129 130 131 132 133 134 135 136 137 138 139 140 141 142 143 144 145 146 147 148 149 150 151 152 153 154 155 156 157 158 159 160 161 162 163 164 165 166 167 168 169 170 171 |
'-------------------------------------------------- ' 아래 한글 테이블 삽입하기 '-------------------------------------------------- ' pHwpCtrl : HwpCtrl OCX ' strTableID : 테이블 ID ' pRowHeightArray : 행 높이 배열 (인덱스는 0부터 시작) ' pColumnWidthArray : 컬럼 너비 배열 (인덱스는 0부터 시작) '-------------------------------------------------- Private Sub HWPInsertTable(pHwpCtrl As HwpCtrl, strTableID As String, pRowHeightArray As Variant, pColumnWidthArray As Variant) Dim pHwpAction As HwpAction Dim pHwpParameterSet As HwpParameterSet Dim pHwpParameterArray As HwpParameterArray Dim I As Integer Dim nRowHeightArrayCount As Integer Dim nColumnWidthArrayCount As Integer nRowHeightArrayCount = UBound(pRowHeightArray) + 1 nColumnWidthArrayCount = UBound(pColumnWidthArray) + 1 Set pHwpAction = pHwpCtrl.CreateAction("TableCreate") Set pHwpParameterSet = pHwpAction.CreateSet() pHwpParameterSet.SetItem "Rows", nRowHeightArrayCount pHwpParameterSet.SetItem "Cols", nColumnWidthArrayCount pHwpParameterSet.SetItem "WidthType", 2 pHwpParameterSet.SetItem "HeightType", 1 pHwpParameterSet.CreateItemSet "TableProperties", "Table" Set pHwpParameterArray = pHwpParameterSet.CreateItemArray("RowHeight", nRowHeightArrayCount) For I = 0 To nRowHeightArrayCount - 1 pHwpParameterArray.SetItem I, HWPGetUnit(CDbl(pRowHeightArray(I))) ' "아래 한글 단위 구하기" 참조 Next Set pHwpParameterArray = pHwpParameterSet.CreateItemArray("ColWidth", nColumnWidthArrayCount) For I = 0 To nColumnWidthArrayCount - 1 pHwpParameterArray.SetItem I, HWPGetUnit(CDbl(pColumnWidthArray(I))) ' "아래 한글 단위 구하기" 참조 Next pHwpAction.Execute pHwpParameterSet pHwpCtrl.SetCurFieldName strTableID, 1, 0, 0 Set pHwpParameterArray = Nothing Set pHwpParameterSet = Nothing Set pHwpAction = Nothing End Sub '-------------------------------------------------- ' 아래 한글 테이블 행 추가하기 '-------------------------------------------------- ' pHwpCtrl : HwpCtrl OCX ' pRowCellValueArray : 행 셀 값 배열 (인덱스는 0부터 시작) '-------------------------------------------------- Public Function HWPSetRowCellValueArray(pHwpCtrl As HwpCtrl, pRowCellValueArray As Variant) If pHwpCtrl.ParentCtrl.ctrlid = "tbl" Then Dim pHwpAction As HwpAction Dim pHwpParameterSet As HwpParameterSet Dim nRowValueArrayCount As Integer Dim I As Integer Set pHwpAction = pHwpCtrl.CreateAction("InsertText") Set pHwpParameterSet = pHwpAction.CreateSet() nRowValueArrayCount = UBound(pRowCellValueArray) + 1 For I = 0 To nRowValueArrayCount - 1 pHwpParameterSet.SetItem "Text", CStr(pRowCellValueArray(I)) pHwpAction.Execute pHwpParameterSet pHwpCtrl.Run "TableRightCell" Next HWPSetRowCellValueArray = True Set pHwpParameterSet = Nothing Set pHwpAction = Nothing Else HWPSetRowCellValueArray = False End If End Function '-------------------------------------------------- ' 아래 한글 셀 값을 갖는 테이블 행 추가하기 '-------------------------------------------------- ' pHwpCtrl : HwpCtrl OCX ' strTableID : 테이블 ID ' pRowCellValueArray : 행 셀 값 배열 (인덱스는 0부터 시작) '-------------------------------------------------- Public Sub HWPAppendTableRowWithCellValue(pHwpCtrl As HwpCtrl, strTableID As String, pRowCellValueArray As Variant) HWPAppendTableRow pHwpCtrl, strTableID ' "아래 한글 테이블 행 추가하기" 참조 HWPSetRowCellValueArray pHwpCtrl, pRowCellValueArray End Sub '-------------------------------------------------- ' 아래 한글 행 셀 정렬 배열 설정하기 '-------------------------------------------------- ' pHwpCtrl : HwpCtrl OCX ' pRowCellAlignmentArray : 행 셀 정렬 배열 (인덱스는 0부터 시작) '-------------------------------------------------- Public Sub HWPSetRowCellAlignmentArray(pHwpCtrl As HwpCtrl, pRowCellAlignmentArray As Variant) Dim nRowCellAlignmentArrayCount As Integer Dim strAlignment As String nRowCellAlignmentArrayCount = UBound(pRowCellAlignmentArray) + 1 pHwpCtrl.Run "TableColBegin" For I = 0 To nRowCellAlignmentArrayCount - 1 strAlignment = CStr(pRowCellAlignmentArray(I)) If strAlignment = "left" Then pHwpCtrl.Run "ParagraphShapeAlignLeft" ElseIf strAlignment = "center" Then pHwpCtrl.Run "ParagraphShapeAlignCenter" Else pHwpCtrl.Run "ParagraphShapeAlignRight" End If If I < nRowCellAlignmentArrayCount - 1 Then pHwpCtrl.Run "TableRightCell" End If Next I pHwpCtrl.Run "TableColBegin" End Sub |
■ 아래 한글의 폰트를 선택하는 방법을 보여준다. ▶ 예제 코드 (VB)
|
1 2 3 4 5 6 7 8 9 10 11 12 13 14 15 16 17 18 19 20 21 22 23 24 25 26 27 28 |
'-------------------------------------------------- ' 아래 한글 텍스트 삽입하기 '-------------------------------------------------- ' pHwpCtrl : HwpCtrl OCX ' strFontName : 폰트명 '-------------------------------------------------- Public Sub HWPSetFont(pHwpCtrl As HwpCtrl, strFontName As String) Dim pHwpAction As HwpAction Dim pHwpParameterSet As HwpParameterSet Set pHwpAction = pHwpCtrl.CreateAction("CharShape") Set pHwpParameterSet = pHwpAction.CreateSet() pHwpAction.GetDefault pHwpParameterSet pHwpParameterSet.SetItem "FaceNameHangul", strFontName pHwpAction.Execute pHwpParameterSet Set pHwpParameterSet = Nothing Set pHwpAction = Nothing End Sub |
■ 아래 한글에서 전체 선택하는 방법을 보여준다. ▶ 예제 코드 (VB)
|
1 2 3 4 5 6 7 8 9 10 11 12 |
'-------------------------------------------------- ' 아래 한글 전체 선택하기 '-------------------------------------------------- ' pHwpCtrl : HwpCtrl OCX '-------------------------------------------------- Public Sub HWPSelectAll(pHwpCtrl As HwpCtrl) pHwpCtrl.Run "SelectAll" End Sub |
■ 아래 한글에서 텍스트를 추가하는 방법을 보여준다. ▶ 아래 한글 텍스트 추가하기 예제 (VB)
|
1 2 3 4 5 6 7 8 9 10 11 12 13 |
Private Sub btnTest_Click() HWPInsertText HwpCtrl1, "테스트" HWPInsertText HwpCtrl1, " " HWPInsertText HwpCtrl1, "문자열" HWPInsertText HwpCtrl1, vbCr + vbLf HWPInsertText pHwpCtrl, "테스트 문자열" End Sub |
▶ 아래 한글 텍스트 추가하기 (VB)
|
1 2 3 4 5 6 7 8 9 10 11 12 13 14 15 16 17 18 19 20 21 22 23 24 25 26 27 28 |
'-------------------------------------------------- ' 아래 한글 텍스트 추가하기 '-------------------------------------------------- ' pHwpCtrl : HwpCtrl OCX ' strText : 텍스트 '-------------------------------------------------- Public Sub HWPInsertText(pHwpCtrl As HwpCtrl, strText As String) Dim pHwpAction As HwpAction Dim pHwpParameterSet As HwpParameterSet Set pHwpAction = pHwpCtrl.CreateAction("InsertText") Set pHwpParameterSet = pHwpAction.CreateSet() pHwpAction.GetDefault pHwpParameterSet pHwpParameterSet.SetItem "Text", strText pHwpAction.Execute pHwpParameterSet Set pHwpAction = Nothing Set pHwpParameterSet = Nothing End Sub |

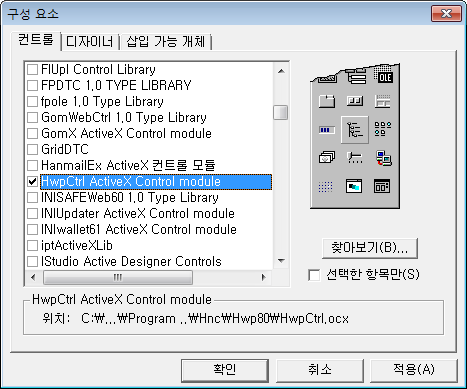
■ 아래 한글을 사용하는 방법을 보여준다. 1. 프로젝트 / 구성 요소 메뉴를 클릭한다. 2. "컨트롤" 탭에서 "HwpCtrl ActiveX Control Module" 항목을 체크한다.
■ CommonDialog 클래스에서 색상 대화 상자를 사용하는 방법을 보여준다. ▶ 예제 코드 (VB)
|
1 2 3 4 5 6 7 8 9 10 11 12 13 14 15 16 17 18 19 20 21 22 23 24 25 26 27 28 29 30 31 |
Private Sub CommandButton1_Click() Dim msg As String Dim button As Long Dim response As Long msg = "배경색을 바꾸시겠습니까?" button = vbYesNo + vbExclamation response = MsgBox(msg, button, "확인") If response = vbYes Then CommonDialog1.CancelError = True On Error GoTo ErrorLabel CommonDialog1.ShowColor Me.BackColor = CommonDialog1.Color End If Exit Sub ErrorLabel: MsgBox "사용자가 취소 버튼을 클릭했습니다." End Sub |
■ CommonDialog 클래스에서 파일 열기 대화 상자를 사용하는 방법을 보여준다. ▶ 예제 코드 (VB)
|
1 2 3 4 5 6 7 8 9 10 11 12 13 14 15 16 17 18 |
CommonDialog1.Filter = "그림 파일|*.bmp; * gif; *.jpg|GIF 파일|*.gif|JPEG 파일|*.jpg" CommonDialog1.FilterIndex = 1 CommonDialog1.DialogTitle = "파일 열기 대화 상자" CommonDialog1.InitDir = "c:\" CommonDialog1.ShowOpen If Len(CommonDialog1.FileName) > 0 Then MsgBox CommonDialog1.FileName + " 파일이 선택되었습니다." Else MsgBox "선택된 파일이 없습니다." End If |

■ 공용 대화 상자 컨트롤을 사용하는 방법을 보여준다. 1. 프로젝트 / 구성 요소 메뉴를 클릭한다. 2. "컨트롤" 탭에서 "Microsoft Common dialog control
■ MSFlexGrid 클래스의 TextMatrix 속성을 사용해 현재 셀 내용을 설정하고 구하는 방법을 보여준다. ▶ 예제 코드 (VB)
|
1 2 3 |
pMSFlexGrid1.TextMatrix(1, 1) = "Sample" |