■ Storage 인터페이스를 사용해 세션 저장소 데이터를 처리하는 방법을 보여준다. ▶ test1.html
1 2 3 4 5 6 7 8 9 10 11 12 13 14 15 16 17 18 19 20 21 22 23 24 25 26 27 28 29 30 31 32 33 34 35 36 37 38 39 40 41 42 43 44 45 46 47 48 49 50 51 52 |
<!DOCTYPE html> <html> <head> <meta charset="UTF-8"> <script language="javascript"> var data; function saveData() { data = 'html5'; sessionStorage.data = 'html5'; localStorage.data = 'html5'; document.getElementById('output').innerHTML = '데이터를 저장했습니다.'; } function loadData() { message = '자바 스크립트 변수 : ' + data + '<br />'; message = message + '세션 저장소 변수 : ' + sessionStorage.getItem('data') + '<br />'; message = message + '로컬 저장소 변수 : ' + localStorage.getItem('data'); document.getElementById('output').innerHTML = message; } function goToNextPage() { location.href = 'test2.html'; } function clearData() { data = ''; sessionStorage.clear(); localStorage.clear(); document.getElementById('output').innerHTML = '데이터를 삭제했습니다.'; } </script> </head> <body> <div id="output">세션 저장소 테스트입니다.</div> <p /> <input type="button" value="데이터 저장" onclick="saveData();" /> <input type="button" value="데이터 로드" onclick="loadData();" /> <input type="button" value="페이지 이동" onclick="goToNextPage();" /> <input type="button" value="데이터 삭제" onclick="clearData();" /> </body> </html> |
▶ test2.html
|
|
<!DOCTYPE html> <html> <head> <meta charset="UTF-8"> </head> <body> <a href="test1.html">이전 페이지로 이동</a> </body> </html> |
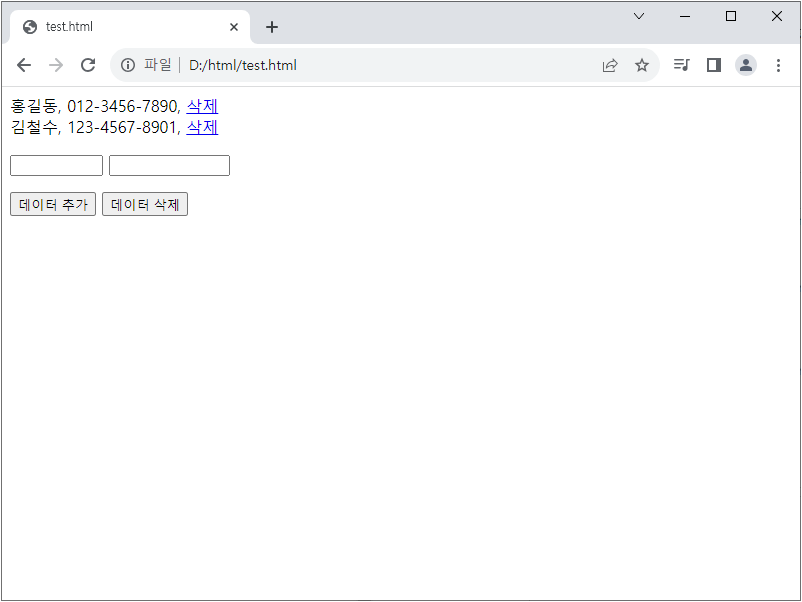
■ Storage 인터페이스를 사용해 로컬 저장소에서 JSON 데이터를 처리하는 방법을 보여준다. ▶ test.html
1 2 3 4 5 6 7 8 9 10 11 12 13 14 15 16 17 18 19 20 21 22 23 24 25 26 27 28 29 30 31 32 33 34 35 36 37 38 39 40 41 42 43 44 45 46 47 48 49 50 51 52 53 54 55 56 57 58 59 60 61 62 63 64 65 66 67 68 69 70 71 72 73 74 75 76 77 78 79 80 81 82 83 |
<!DOCTYPE html> <html> <head> <meta charset="UTF-8"> <script language="javascript"> function onLoad() { var array = JSON.parse(localStorage.getItem('phonebook')); if(array == null) { localStorage.setItem('phonebook', JSON.stringify(new Array)); } showData(); } function showData() { var message = ''; var array = JSON.parse(localStorage.getItem('phonebook')); for(var i = 0; i < array.length; i++) { message = message + array[i].name + ', ' + array[i].phone + ', ' + '<a href="javascript:removeData(' + i + ');">삭제</a><br />'; } document.getElementById('output').innerHTML = message; } function AddData() { var value1; var value2; var array = JSON.parse(localStorage.getItem('phonebook')); value1 = document.getElementById('name').value; value2 = document.getElementById('phone').value; array[array.length] = { name : value1, phone : value2 }; localStorage.setItem('phonebook', JSON.stringify(array)); showData(); document.getElementById('name').value = ''; document.getElementById('phone').value = ''; } function removeData(i) { var array = JSON.parse(localStorage.getItem('phonebook')); array.splice(i, 1); localStorage.setItem('phonebook', JSON.stringify(array)); showData(); } function clearData() { localStorage.removeItem('phonebook'); localStorage.setItem('phonebook', JSON.stringify(new Array)); showData(); } </script> </head> <body onload="onLoad();"> <div id="output">로컬 저장소 JSON 데이터 테스트입니다.</div> <p /> <input id="name" type="text" size="8" /> <input id="phone" type="text" size="12" /> <p /> <input type="button" value="데이터 추가" onclick="AddData();" /> <input type="button" value="데이터 삭제" onclick="clearData();" /> </body> </html> |
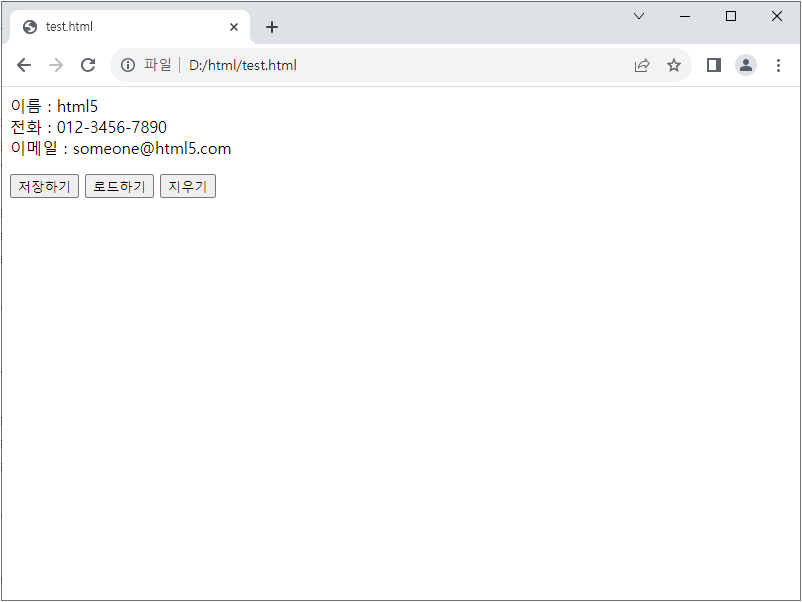
■ Storage 인터페이스를 사용해 로컬 저장소의 데이터를 처리하는 방법을 보여준다. ▶ test.html
1 2 3 4 5 6 7 8 9 10 11 12 13 14 15 16 17 18 19 20 21 22 23 24 25 26 27 28 29 30 31 32 33 34 35 36 37 38 39 40 41 |
<!DOCTYPE html> <html> <head> <meta charset="UTF-8"> <script language="javascript"> function saveData() { localStorage.name = 'html5'; localStorage['phone'] = '012-3456-7890'; localStorage.setItem('email', 'someone@html5.com'); document.getElementById('output').innerHTML = '로컬 저장소에 데이터가 저장되었습니다.'; } function loadData() { message = '이름 : ' + localStorage['name'] + '<br />'; message = message + '전화 : ' + localStorage.getItem('phone') + '<br />'; message = message + '이메일 : ' + localStorage.email; document.getElementById('output').innerHTML = message; } function clearData() { localStorage.clear(); document.getElementById('output').innerHTML = '로컬 저장소의 데이터가 모두 제거되었습니다.'; } </script> </head> <body> <div id="output">로컬 저장소 테스트입니다.</div> <p /> <input type="button" value="저장하기" onclick="saveData();" /> <input type="button" value="로드하기" onclick="loadData();" /> <input type="button" value="지우기" onclick="clearData();" /> </body> </html> |
■ Copy-Item 명령에서 -Path/-Destination/-Filter 스위치를 사용해 텍스트 파일만 복사하는 방법을 보여준다. ▶ 실행 명령
|
|
Copy-Item -Path d:\source -Destination d:\target -Filter *.txt |
■ Get-ChildItem 명령에서 -Path/-Recurse 스위치를 사용해 디렉토리/파일명 리스트를 구하는 방법을 보여준다. ▶ 실행 명령
|
|
(Get-ChildItem -Path d:\source -Recurse).FullName |
■ Copy-Item 명령에서 -Path/-Destination/-Recurse 스위치를 사용해 소스 디렉토리를 생성 타겟 디렉토리에 복사하는 방법을 보여준다. ▶ 실행 명령
|
|
Copy-Item -Path "d:\source" -Destination "d:\target" -Recurse # 타겟 디렉토리가 없는 경우 타겟 디렉토리를 생성하고 복사한다. # 타겟 디렉토리가 있는 경우 타겟 디렉토리 아래에 소스 디렉토리를 생성고 복사한다. |
■ Copy-Item 명령에서 -Destination/-ToSession 스위치를 사용해 원격 컴퓨터에 복사하는 방법을 보여준다. ▶ 실행 명령
|
|
$Session = New-PSSession -ComputerName "server01" -Credential "password\userid" Copy-Item "d:\localSource\sample.txt" -Destination "d:\remoteTarget" -ToSession $Session |
■ Copy-Item 명령에서 -Path/-Destination/-Recurse 스위치를 사용해 소스 디렉토리를 기존 타겟 디렉토리에 복사하는 방법을 보여준다. ▶ 실행 명령
|
|
Copy-Item -Path "d:\source\*" -Destination "d:\target" -Recurse # 타겟 디렉토리가 없는 경우 에러가 발생한다. |
■ Copy-Item 명령에서 -Path/-Destination 스위치를 사용해 소스 파일을 타겟 디렉토리에 복사하는 방법을 보여준다. ▶ 실행 명령
|
|
Copy-Item -Path "d:\source\sample.txt" -Destination "d:\target" |
■ Remove-Item 명령에서 -Path 스위치를 사용해 파일을 삭제하는 방법을 보여준다. ▶ 실행 명령
|
|
Remove-Item -Path d:\sample.txt |
■ Test-Path 명령에서 -Path 스위치를 사용해 파일 존재 여부를 구하는 방법을 보여준다. ▶ 실행 명령
|
|
Test-Path -Path d:\sample.txt |
■ Get-Content 명령에서 -Encoding 스위치를 사용해 파일을 읽는 방법을 보여준다. ▶ 실행 명령
|
|
Get-Content 'd:\test.txt' -Encoding UTF8 |
■ Set-Location 명령에서 -Path 스위치를 사용해 현재 위치를 변수 저장소로 변경하는 방법을 보여준다. ▶ 실행 명령
|
|
Set-Location -Path Variable: |
■ 특정 디렉토리에서 첫번째 텍스트 파일을 읽는 방법을 보여준다. ▶ 실행 명령
|
|
$File = Get-ChildItem -Path d:\*.txt -File | Select-Object -First 1 $Content = Get-Content -Path $File.FullName -Encoding UTF8 $Content |
■ Get-Content 명령을 사용해 환경 변수 값을 구하는 방법을 보여준다. ▶ 실행 명령
|
|
Get-Content Env:\PSModulePath |
■ Get-ChildItem 명령에서 -Path/-File 스위치를 사용해 특정 경로 파일 리스트를 구하는 방법을 보여준다. ▶ 실행 명령
|
|
Get-ChildItem -Path d:\ -File |
■ Set-Item 명령을 사용해 TrustedHosts 리스트를 지우는 방법을 보여준다. ▶ 실행 명령
|
|
Set-Item WSMan:\localhost\Client\TrustedHosts -Value "" |
■ Get-Item 명령을 사용해 TrustedHosts 리스트를 구하는 방법을 보여준다. ▶ 실행 명령
|
|
Get-Item WSMan:\localhost\Client\TrustedHosts |
■ Set-Item 명령을 사용해 TrustedHosts 리스트를 설정하는 방법을 보여준다. ▶ 실행 명령
|
|
Set-Item WSMan:\localhost\Client\TrustedHosts -Value "192.168.100.11" Set-Item WSMan:\localhost\Client\TrustedHosts -Value "192.168.100.11,192.168.100.13" Set-Item WSMan:\localhost\Client\TrustedHosts -Value "*" |
■ Get-ChildItem 명령을 사용해 WSMan 공급자를 통해 WS-Management 구성 데이터 저장소에서 TrustedHosts 리스트를 구하는 방법을 보여준다. ▶ 실행 명령
|
|
Get-ChildItem WSMan:\localhost\Client\TrustedHosts |
■ Get-ChildItem 명령에서 -Path 스위치를 사용해 레지스트리에서 특정 하위 키 리스트를 구하는 방법을 보여준다. ▶ 실행 명령
|
|
Get-ChildItem -Path HKCU:\PowerShell |
■ New-ItemProperty 명령을 사용해 레지스트리에서 특정 키의 값을 생성하는 방법을 보여준다. ▶ 실행 명령
|
|
New-ItemProperty -Path HKCU:\PowerShell\School -Name Class -Value basic |
■ Remove-Item 명령에서 -Path 스위치를 사용해 레지스트리에서 특정 키를 제거하는 방법을 보여준다. ▶ 실행 명령
|
|
Remove-Item -Path HKCU:\PowerShell\School |
■ New-Item 명령을 사용해 레지스트리에서 특정 키를 생성하는 방법을 보여준다. ▶ 실행 명령
|
|
New-Item -Path HKCU:\PowerShell -Name School |
■ New-PSDrive 명령에서 -Name/-Root/-PSProvider 스위치를 사용해 임시 드라이브를 만드는 방법을 보여준다. ▶ 실행 명령
|
|
New-PSDrive -Name PROGDIR -Root "c:\Program Files" -PSProvider FileSystem |

